|
Install Ozeki 10 on Ubuntu LinuxOn this page you will find detailed information about how to install Ozeki 10 on Ubuntu Linux. At first the prerequisites will be listed, then you will learn how to get the necessary components. Finally, you will show how to access the GUI of Ozeki 10 from a web browser. Step 1 - Get root privilegesYou need to have root privileges to install the Ozeki software and its dependencies. To perform this, issue sudo -s command at the beginning of the installation. This command delegates the authority to you to run all forthcoming commands as root. Due to this, your Linux operating system will not require you to use 'sudo' command before each command that need root privileges to perform. Open Terminal using Ctrl + Alt + T shortkey (by default) then issue the following command (demonstrated in Figure 1).
Step 2 - Add the Mono repository to your systemMono is an open source implementation of Microsoft's .NET Framework. Ozeki 10 needs it to be operate. To be able to install the latest release of Mono, you need to add the official Mono repository to your system. If you are running Ubuntu 18.04 on your computer, you can use the commands below to perform the addition like in Figure 2. If you are running other version of Ubuntu, please follow the instructions on the official Mono site at https://www.mono-project.com/download/stable/#download-lin-ubuntu.
Step 3 - Install MonoDuring the previous step, you added the official Mono repository to your system. Due to this, you will be able to install the latest Mono package and all its dependencies by issuing apt install mono-complete command (Figure 3). This will install all of the components of Mono. The installation process may take a few minutes.
Step 4 - Install other required dependenciesThere are some other dependencies that Ozeki 10 needs to be installed without any error. These dependencies are exactly the following packages: libturbojpeg, libportaudio2, xvfb, libspeexdsp1 and fonts-symbola. You can install them by issuing the command below. The Figure 4 demonstrates this step.
Step 5: Download the latest installerThe latest release of Ozeki 10 can be downloaded from http://www.ozeki.hu/index.php?owpn=1017&download_product_id=19. To download the latest package for Linux, you need to click on the ozeki_10.x.xx_all.deb link as Figure 5 shows below. We recommend you to always download the latest software package. The latest one includes the latest features and improvements.
Step 6 - Install Ozeki 10During the previous step, you downloaded the Ozeki 10 package to the 'Downloads' folder of your system (by default). Please navigate here by issuing cd Downloads/ command. To install Ozeki 10, issue dpkg -i package_name.db (replace the package name with the name of the downloaded file) command. During the installation, the installer asks you to provide a password for the admin user. This will be the first user you can use to log in to Ozeki 10. You can see a successful installation in Figure 6.
Step 7 - Start Ozeki serviceServices are programs that operate in the background. They can be automatically started when the computer boots, can be paused and restarted. Ozeki 10 runs in the background as a service. After successful installation, the Ozeki 10 service is stopped by default. So you need to start it by issuing service ozeki start command. By issuing service ozeki status command, you can check its status. If it is active (Figure 6), it means that it is running in the background.
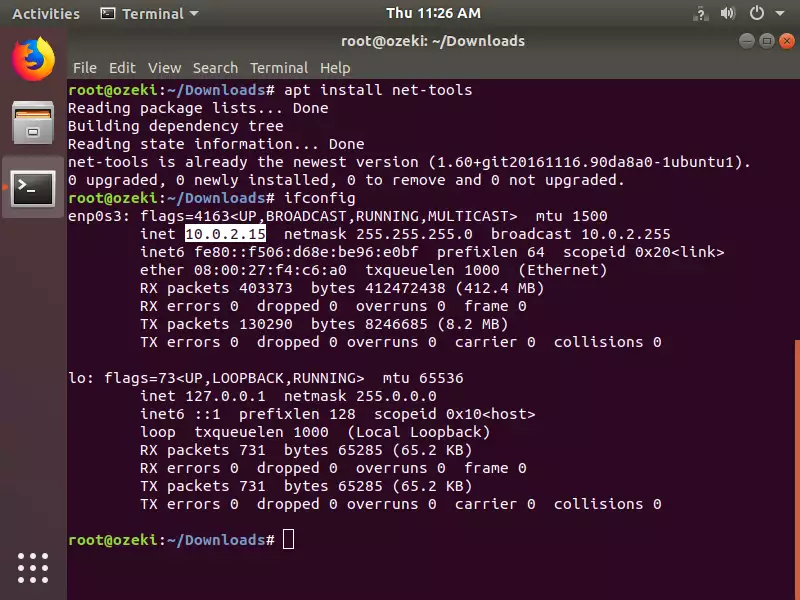
Step 8 - Get the IP address of your PCTo access the GUI of Ozeki 10, you need to know the IP address of your system. If you do not know, you can find it by issuing the ifconfig command. This command is part of the net-tools package. If it is not installed on your system, you can install it by issuing apt install net-tools. You can read your IP adress after 'inet' label (highlighted in Figure 8).
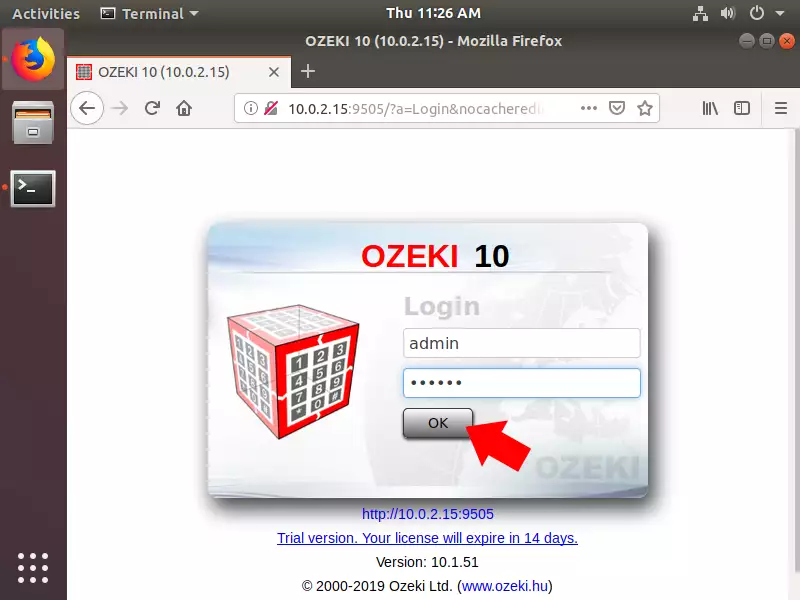
Step 9: Log in to Ozeki 10If the Ozeki 10 service is running, the Ozeki Desktop GUI can be reached by typing the IP address of your computer and port 9505 (separated by a colon) into the searchbar of your web browser. You can also access it from other computers if they are connected to the same LAN as the computer the Ozeki 10 installed on. The login screen of the GUI will be shown (Figure 9). Please type your password you provided during the installation then click OK to log in.
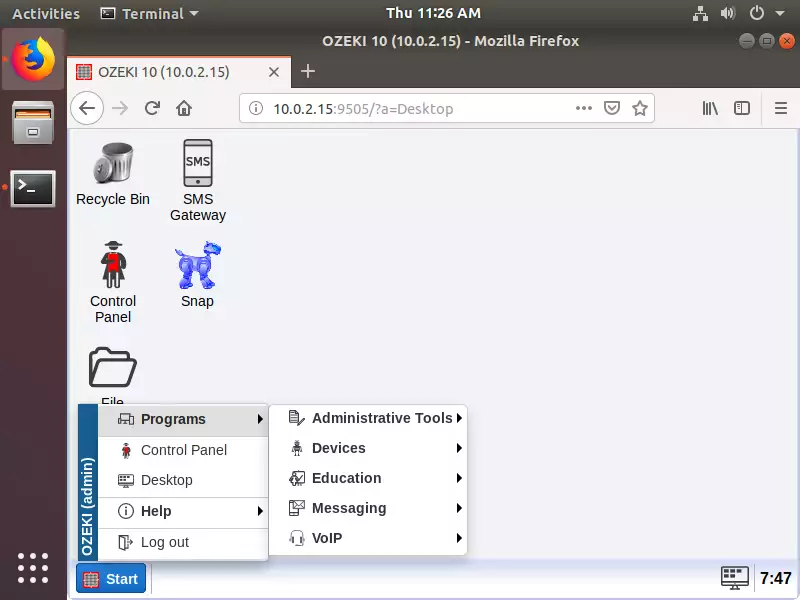
Step 10: Check programs in Ozeki 10After successful login, you will see the Ozeki Desktop page (Figure 10). On this desktop, you can see shortcuts to some applications such as Contol Panel, File Manager, Phone System, Snap etc. The Control Panel is a very important component of Ozeki 10. Here you can create connections, routes between connections, new users, configure the system settings etc. To access all the installed applications, please navigate to the Start menu and select the Programs option.
|
Copyright © 2000- -
Ozeki Ltd |
info@ozeki.hu
Home > Products > Ozeki 10 > Installation guide > Installation guide > Ubuntu |
|