SMS Gateway One installation
This tutorial explains how you can send text messages from Ozeki SMS Gateway One, which is a hardware SMS gateway running Linux. First, you will find information on how to setup the device and then we you will see how you can send an SMS message from a webbrowser.
What is a hardware SMS Gateway?
A hardware SMS Gateway makes sending SMS messages from a computer possible without any additional external devices. This solution consists of an Ozeki SMS Gateway One, which is a SIM based hardware SMS gateway and the recipient's mobile phone number. Our Ozeki SMS Gateway One device comes with the Ozeki SMS Gateway application pre-installed on a Linux Operating system, and it's responsible for compiling the message. It needs an address and a text body. It will submit the SMS message to your service provider. The service provider will deliver the message to the address phone number as an SMS message.

Ozeki SMS Gateway One (Quick setup)
To send SMS with an Ozeki SMS Gateway One:
- Insert the SIM card into the computer
- Plug the antennas into the computer
- Connect the computer to a power supply
- Launch the Ozeki SMS Gateway
- Run the sms modem autodetection
- Specify the sms phone number
- Write the text of the SMS message
- Click on Send to send the SMS
- Review the test SMS message you sent
More information about the product
Ozeki SMS Gateway One hardware setup (video tutorial)
In this video you will learn how you can set up an Ozeki SMS Gateway One Device to send text messages (SMS) natively, from the
computer. The video starts from the very beginning of your installation process until your first power on and by completing the
steps shown in this video, you will have a working Ozeki SMS Gateway One PC with peripherals connected and Ethernet connection.
The tutorial only takes about two minutes to view and about 5-10 minutes to finish with our easy to follow steps and explanations.
First, connect together the power supply with it's mains adapter and connect it to the device via the DC port. Then insert the SIM
card into the computer, connect the antennas to the computer and supply electricity to it with the help of the power supply.
Once the computer is successfully connected to electricity, the power led will light up to indicate that it is working and running.
Get the parts that you need to setup the computer correctly
You need a SIM card, two antennas, power supply with mains cable, the computer itself and an HDMI cable (All included with Ozeki SMS Gateway One). (All shown in Figure 2) Make sure that you have all the hardwares that you need to use the modem because every little detail is important.

Connect the power supply
The Ozeki Gateway One uses a 12V DC external power supply, to connect your power supply, you will need it's mains adapter, connect the two together to be able to plug your power supply into the mains network. (Figure 3)

Connect the computer to the power supply
Connect your computer to the power supply. Look for the DC plug on the power supply and insert it into the computers 12V DC port next to the Ethernet connectors (Figure 4)

Insert your SIM card
To insert your SIM card, you will need to adapt it to the correct form. The Ozeki Gateway One uses micro SIM-s. If your SIM card does not come pre-cut for you, you can take it to your service provider or a local gsm shop to cut it for you, if your SIM card is smaller than a micro SIM, you may have to buy an adapter if you have lost your original one. Insert the SIM next to the antennas, contacts facing towards the white print on the case. (Correct seating can be seen on Figure 5)

Important settings for SIM card
These settings are very important, and if you do not finish these, your SIM card won't work with Ozeki Gateway One. You must disable your PIN code and redirect phone calls to another phone number. You can do these steps on a normal mobile phone(Figure 6)

Attach antennas
To connect your antennas, look for two ports next to the SIM slot. Once you found them, screw in the two antennas tightly to ensure a stable connection without them getting loose. The included antennas should give you excellent and high speed connectivity, but you can use your own antennas as well. (Figure 7)

Connect Peripherals
You will need to connect your Peripherals to your Ozeki SMS Gateway One to set it up, like your keyboard and mouse. There are four USB ports which should be plenty enough for most cases, but if you need more, you can always use a USB hub (Figure 8)

Connect your Display
You will need to connect your computer to a display, you can use the included HDMI cable, or a DisplayPort cable to connect to your display, if you don't have any of these ports available, you can always buy an adapter to suit your devices. Connect your preferred cable next to the USB ports. (Figure 9)

Connect your computer to your Ethernet network
You have to connect your computer to the internet to function normally, this can be done through the 4 ethernet ports on the back of the computer (Figure 10)

Connect your computer to electricity
You must connect your computer to electricity, look for a mains connector near where you want to use your Ozeki Gateway One and connect it. (Figure 11)

Turn your computer on
Once you have plugged in your computer, it should turn on by itself, but if it does not, you may need to press the power button (Location seen on Figure 12) between the USB ports. If it lights up blue, it's turned on and you should be able to see your computer boot on your display.
Ozeki SMS Gateway One software setup (video tutorial)
The following video will help you prepare your Ozeki SMS Gateway One Computer for SMS Messaging. This video starts from your first
power on and by the end of it, if you follow our step-by-step guide, you should be able to send text messages on demand.
The tutorial is about two minutes to watch and requires about 10-15 minutes to complete with clear steps and guides during the
whole process. The Ozeki SMS Gateway One PC runs Linux and you will have install a new SMS modem connection on it to send a
test message to a specified phone number and use it as an SMS Gateway.
This tutorial gives you a good understanding of how to setup an SMS modem on your Ozeki SMS Gateway One PC to send automated
or bulk text messages like alarms and notifications.

Log in to Linux
Login to Linux by clicking on user, which can be found in the middle and enter the default password, which is abc123, this will grant you access to the computer and let you configure your SMS Gateway and use your Ozeki SMS Gateway One. (Figure 13)

Open your Browser
To open your browser in Linux, find the browser on the Linux Desktop, you can find it on the left side, click on it and your browser will open, you can open Ozeki Software Platform there. (See Figure 14)
Open Ozeki 10
To open Ozeki Software Platform, at the top of the browser, you have to enter https://localhost:9515, this will open Ozeki Software Platform, you will be able to configure your SMS Modem, which is built into the Ozeki SMS Gateway One. (See Figure 15)

Open SMS Gateway
Open the Ozeki SMS Gateway in the Ozeki Platform Software, you have a few default apps, usually placed on the left, open SMS Gateway, it has a phone icon with SMS written inside of it. This will open the SMS Gateway Application. (See Figure 16)

Add a new connection
To add a new connection in Ozeki SMS Gateway, find the add new connection link in the left Connections panel and click it. This will open the connection list page where you will be able to setup an SMS modem. (Figure 17)

Install SMS Modem
In the connection list, look for SMS modem and an Install link next to it, it is at the top of the list in the Wireless Connections (SMS, MMS) group, click the link to begin setting up your SMS Gateway and send messages. (See Figure 18)

Set the modems name
In the settings, under the General tab, you can set a custom name for your modem, don't use special characters like questionmarks or stars, this is highly recommended to avoid confusion when you have several connections setup. (See Figure 19)

Select the Modem Port
Under Serial port, you have to open the Port dropdown menu and look for /dev/ttyUSB1, select it to start configuring the built in modem of the Ozeki SMS Gateway One and send messages via 4G, if ttyUSB1 does not work later on, try the other ports. (See Figure 20)

Click Autodetect
Next to the dropdown menu, find the blue button with the text Autodetect, click this button to automatically get all data from your SIM card like your phone number and configure it, it may take a few seconds. (See Figure 21)

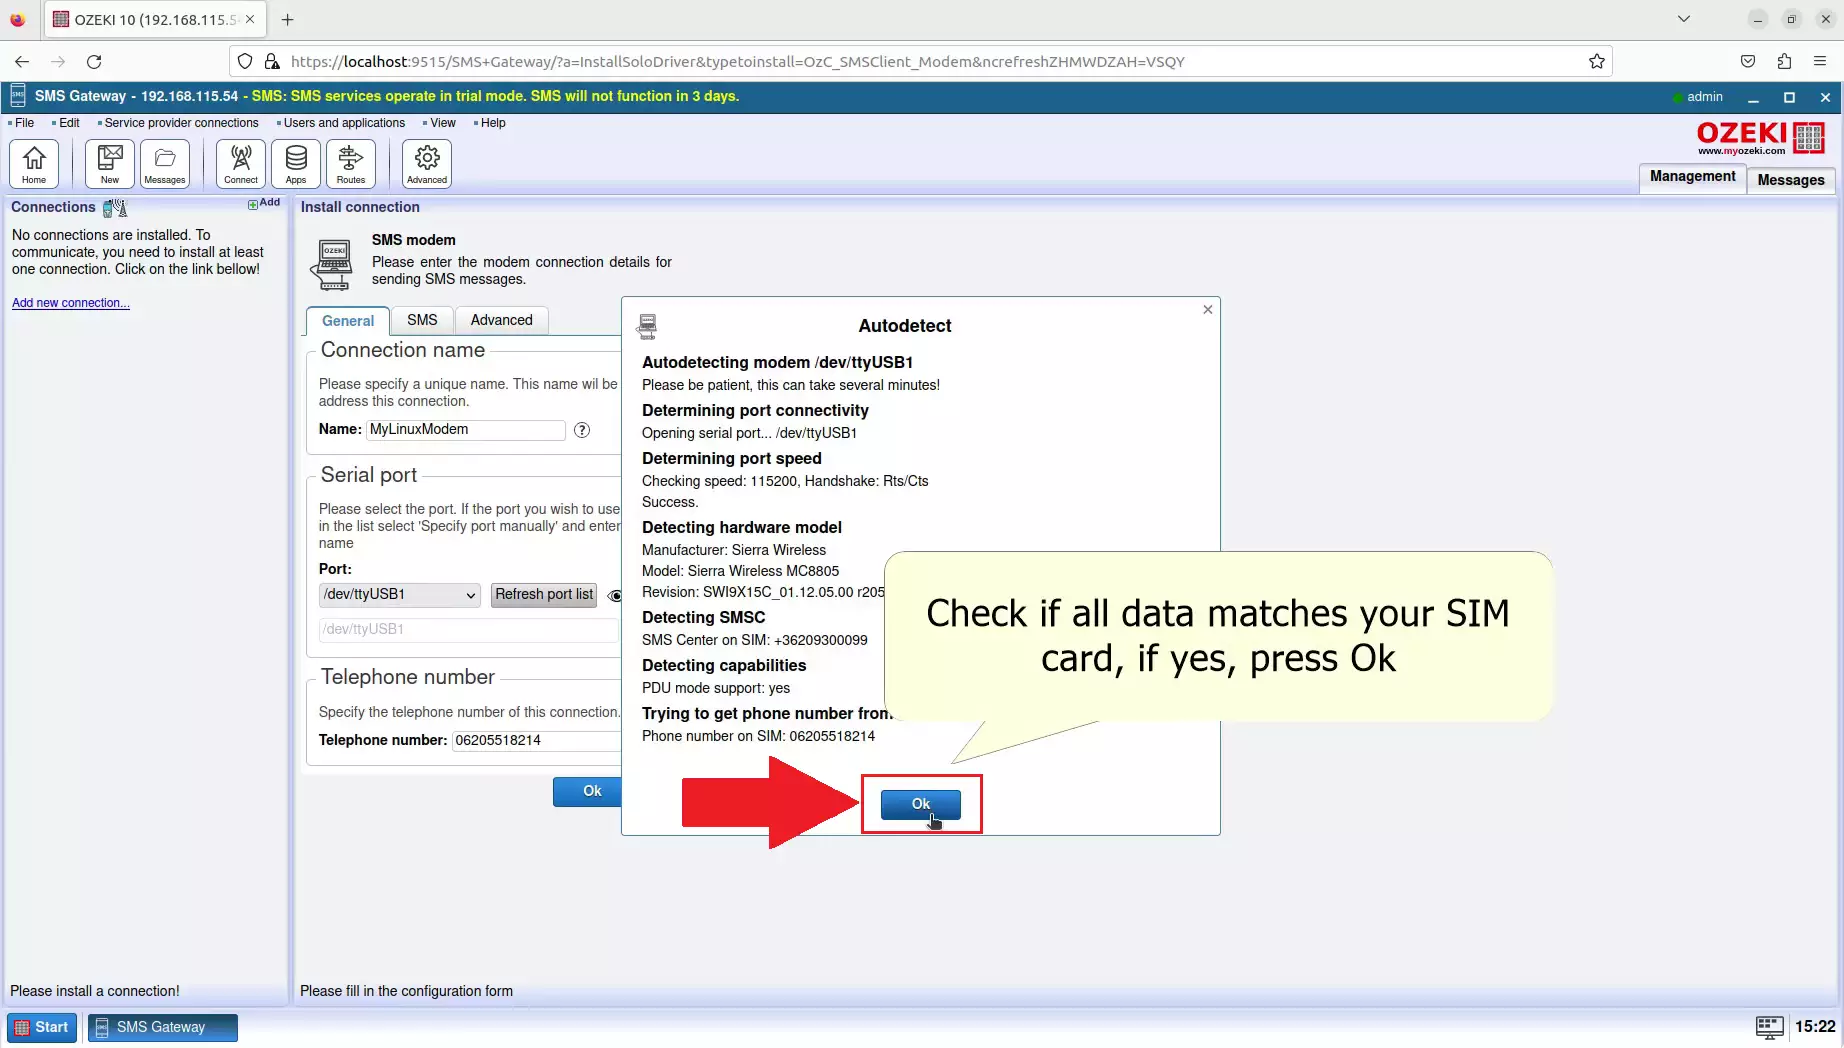
Check if your details are correct
Check your details, a window will pop up named Autodetect, check if every detail matches to your SIM card, you can also see the modem details here. Click on the Ok button at the bottom when you are done checking everything. This will finish the Autodetect procedure and ready your modem for sending sms messages from your computer. (See Figure 22)
Finish setting up your modem
To finish setting up your modem, look for the blue Ok button at the bottom. If you wish to make other changes to your modem, you can do it now under the SMS tab or the Advanced tab, or you can come back to this tab after pressing Ok with the Configure tab later on. (See Figure 23)

Enable SMS Modem Connection
To enable SMS modem connection, find the Connection group on the left, you have to Enable the Connection switch, which is the second option in the group. Click on it to make it green and your modem will start connecting to your service provider. (See Figure 24)

Wait for the connection to establish
Wait for your connection to properly setup, this may take a few seconds, but be patient, if you see "GSM Modem polling started" in the Events tab, your Modem is up and running. You can go to the next step to send messages from your modem.(See Figure 25)

Navigate to the Test tab page
Navigate to the navigation bar in the right panel and click Test to open the Test tab page and enter the Test SMS sending page. You can send test messages from here to anyone with custom content. (See Figure 26)

Fill the recipient's address and test message
Fill in the recipient's address and enter the test message, look for the To field in the Recipient group, you can enter the phone number there, and type into the SMS textfield what you want to send. You can write whatever you want here. (See Figure 27)

Send the SMS
Send the SMS if you are done, look for a blue Send button at the bottom of the screen. Click on the button to send the message and you will soon receive the SMS on the specified phone number. (See Figure 28)

Check the test message
Check the test message on your mobile device, look for an application that handles SMS messages and open it, if you see your test message appear with the correct content, your SMS modem is working correctly, congratulation! (See Figure 29)
