How to use an Arduino ultrasonic sensor
The following document contains some useful information about Arduino ultrasonic sensors. With this sensor, you can easily measure the distance between objects and generate events in case of certain measurements. The guide provides some basic definitions about the ultrasonic sensor and how to connect it to your Arduino and control it from your computer using Ozeki 10. So, let's get started.
What is an ultrasonic sensor?
The ultrasonic sensor uses SONAR to determine the distance of an object just like the bats do. It offers excellent non-contact range detection with high accuracy and stable readings in an easy-to-use package from 2 cm to 400 cm or 1” to 13 feet.
How does an ultrasonic sensor work?
Ultrasonic sensors work by emitting sound waves at a frequency too high for humans to hear. They then wait for the sound to be reflected back, calculating distance based on the time required. This is similar to how radar measures the time it takes a radio wave to return after hitting an object.
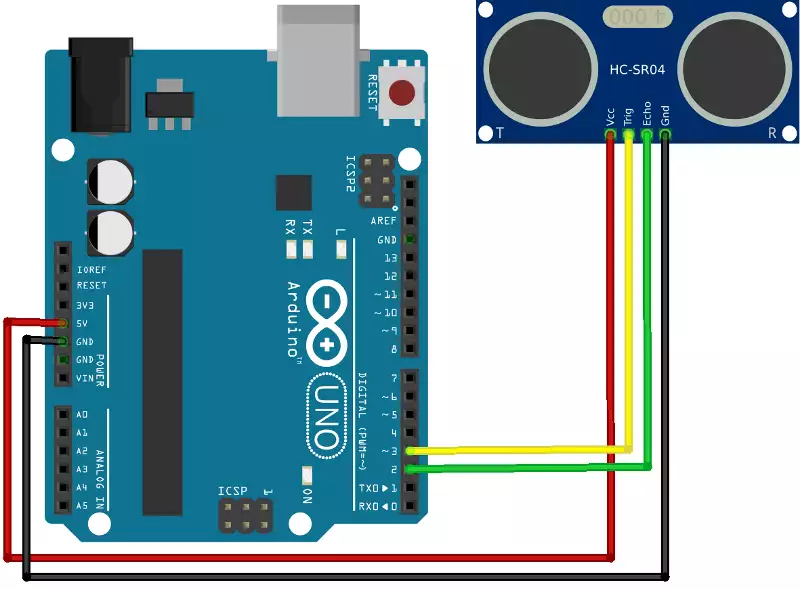
Arduino Button wiring diagram

How to use an Arduino ultrasonic sensor in Ozeki
Ultrasonic Sensor connection forwards measurement data from the ultrasonic sensor to a selected Ozeki connection. Ultrasonic measurement data is in cm. You can always ask the current distance between any object and the sensor. A measurement change threshold can be set that will generate automatic events everytime the measurement passes the threshold. To use the Ultrasonic Sensor in Ozeki, you first need to download Ozeki Robot Developer. Ozeki Robot Developer will install the Arduino libraries needed to use this sensor efficiently.
Download Ozeki Robot Developer

After Ozeki Robot developer is installed, you need to upload the Ultrasonic Sensor control code to your Arduino. You can find the code and download instructions on the following pages. The upload process includes two steps: first you need to format the EEPROM of the arduino, then you need to upload the control code. The procedure is very simple, it only takes a few seconds.
Upload the Ultrasonic Sensor code to Arduino Uno
Upload the Ultrasonic Sensor code to Arduino Mega 2560
Upload the Ultrasonic Sensor code to Arduino Nano
Upload the Ultrasonic Sensor code to Raspberry Pi
Upload the Ultrasonic Sensor code to Ozeki Matrix
The arduino sensors and Ozeki will communicate over the USB port using the Ozeki Ultrasonic Sensor protocol. This protocol makes it possible for you to use the sensor directly on your PC. You will be able to control this sensor through the web based user interface or you will be able to communicate with it using Ozeki Chat. You can read more about chat control on the following page.
How to communicate with the Ultrasonic Sensor using chat
It is important to understand chat control, because when you build a robot, the way you wish to control this sensor is by sending and receiving messages. If you open the Ozeki Robot Developer app, you will see, who you can write a C#.Net program to work with this sensor.
Connection steps
- Connect the Ultrasonic sensor to your Arduino using the wiring diagram
- Plug the Arduino board into your computer
- Check the COM ports to make sure your Arduino is connected
- Open the Arduino application on your PC
- Upload example code to the microcontroller
- Open Ozeki 10 GUI in your browser
- Choose the connection of the Ultrasonic sensor
- Click 'Measure' to get data from the sensor
System overview
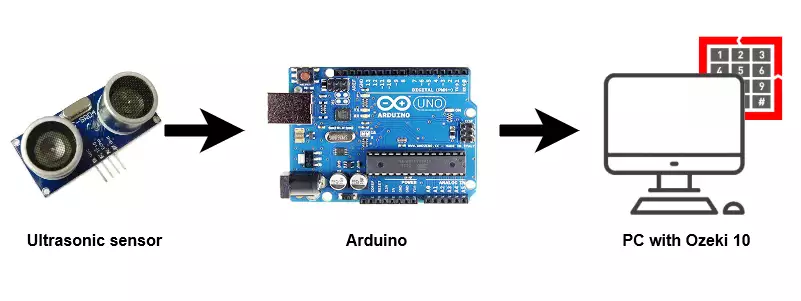
The system we suggest consists of an ultrasonic sensor, that is wired to the analog port of your Arduino. The Arduino will be responsible for reading data from this device in real-time. The brain of the system will be running on a PC (Figure 2). On the PC, Ozeki 10 will be able to manage the communication. You can easily run Ozeki 10 using a webbrowser

Prerequisites
- Ultrasonic sensor
- Ozeki 10 installed on your computer
- Programmable board (Arduino Mega/Nano/Uno, Ozeki Ultrasonic Module or Raspberry Pi)
- USB cable is needed between Arduino Mega/Nano/Uno, Ozeki Ultrasonic Module and your computer
Step 1 - Wire the ultrasonic sensor to your Arduino
You can see how to wire the ultrasonic sensor to any of the following boards:
- Arduino Uno
- Ozeki Ultrasonic Module
- Raspberry Pi
(If you use Raspberry Pi please jump to 'Step 3')
After wiring, please plug the board to your computer!
Step 2 - Upload code to the microcontroller
Step 3 - Start Ozeki 10 to try the ultrasonic sensor
Step 4 - Configure the ultrasonic sensor in Ozeki 10
To be able to configure your ultrasonic sensor (attached to your Arduino) in Ozeki 10, that is installed on your computer, you need to open the graphical user interface (GUI) of Ozeki 10. You can open the GUI by entering the URL of the computer into your webbrowser. For example, if our PC has an IP address of 192.168.1.5, we would enter http://192.168.1.5:9513 into our webbrowser.
Step 5 - Understand the ultrasonic sensor protocol
The Ultrasonic Sensor can communicate with Ozeki through the following protocol.
References:
https://www.arrow.com
https://www.tutorialspoint.com
