Arduino Nano LCD Display Control Code
HD44780 character LCD displays are monochrome visualisation devices. You can get them in 16x1, 16x2 and 20x4 dimensions, which represents columns x rows.
It is able to display 240 different built in characters, but you can create your own characters if you wish.
Set the cursor anywhere and display character strings or clear display anytime. The backlight can be turned on or off depending on your choice (Figure 1).
On Figure 2 you can see a connection where the backlight is continuously powered by 5V.
The backlight color can differ depending on the LCD's specification. Scroll below to see some codes for both Figure 1 and 2.
Upload the code for your wiring, so Ozeki 10 can use your LCD connection.
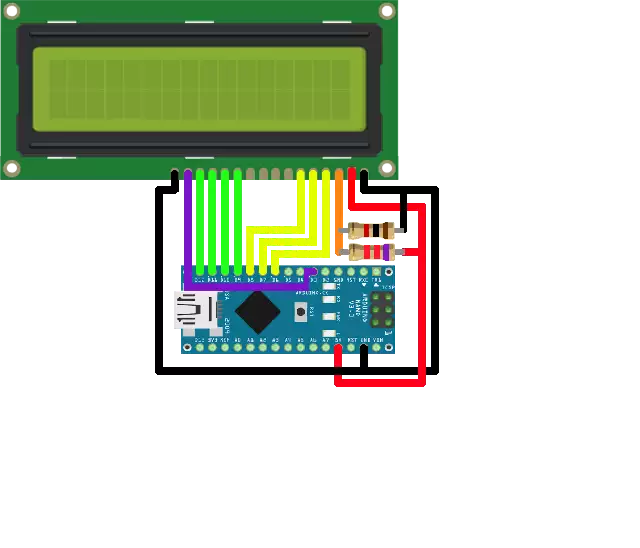
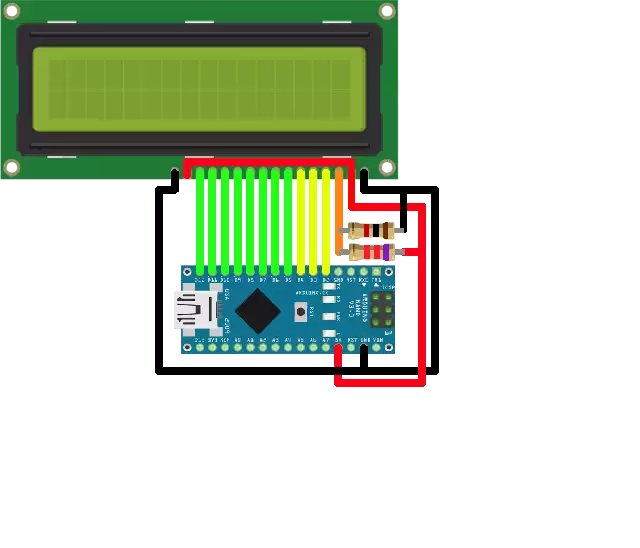
Figure 1 - 4 pin wiring from D9 to D12 Figure 2 - 8 pin wiring from D5 to D12 |
Required hardware
- Arduino Nano
- LCD Display
- Resistors: 1kΩ, 7.2kΩ
The 4 pin source code to install on controller (Figure 1)
Before you upload this code to your Arduino, please format the EEPROM...
#include <OzIDManager.h>
#include <OzLcdDisplayController.h>

// global pointers
OzIDManager* manager;
OzLcdController* lcdController;

const int backlight_pin = 3;
const int RS = 6;
const int RW = 7;
const int EN = 8;
const int D4 = 9;
const int D5 = 10;
const int D6 = 11;
const int D7 = 12;

void setup()
{
  Serial.begin(115200);

  manager = new OzIDManager;
  manager->_sendACK = true;
  manager->_checksum = true;

  OzCommunication::setIDManager(manager);
  lcdController = new OzLcdController(RS, RW, EN, D4, D5, D6, D7);
  lcdController->SetBacklight(backlight_pin, 100); //100% backlight

  int x=1;
  manager->sendLinkSetup();
  manager->PrintWelcomeLine(lcdController, x++, "MyLCD");
  lcdController->LoginDisplaySize(16, 2);
}

void loop()
{
  OzCommunication::communicate();
}
The 8 pin source code to install on controller (Figure 2)
Before you upload this code to your Arduino, please format the EEPROM...
#include <OzIDManager.h>
#include <OzLcdDisplayController.h>

// global pointers
OzIDManager* manager;
OzLcdController* lcdController;

const int RS = 2;
const int RW = 3;
const int EN = 4;
const int D0 = 5;
const int D1 = 6;
const int D2 = 7;
const int D3 = 8;
const int D4 = 9;
const int D5 = 10;
const int D6 = 11;
const int D7 = 12;

void setup()
{
  // wait for serial port
  Serial.begin(115200);

  // instantiate objects
  manager = new OzIDManager;
  manager->_sendACK = true;
  manager->_checksum = true;

  OzCommunication::setIDManager(manager);

  lcdController = new OzLcdController(RS, RW, EN, D0, D1, D2, D3, D4, D5, D6, D7);

  // welcome devices
  int x = 1;
  manager->sendLinkSetup();
  manager->PrintWelcomeLine(lcdController, x++, "MyLCD");
  lcdController->LoginDisplaySize(16, 2);
}

void loop()
{
  OzCommunication::communicate();
}